
Whether Offshore or Surface, we have it all, a lot of Server
options for various types of use!


Main sales at Impreza Host,
get the solution that works for you


These days, you can’t get hardly anything done without a good, working web browser, but what do you do when Google Chrome starts acting up? Here’s a guide for how to clean up some of Google Chrome’s most common issues including slow loading, excess notifications, using the wrong search engine, and more.
Note: This guide is only intended for Google Chrome for Windows, Mac, Linux, and Chrome OS. The instructions here do not apply to Chrome on smartphones, but do let us know in the comments or on Twitter if you’d like to see a similar guide for Android or iOS.
Before we dive in, I want to make sure we all understand that there’s a difference between “Google” and “Google Chrome.” “Google Chrome” is a web browser, the tool you use to view sites on the internet, including the one you’re on right now! Google Chrome is used for the same things as Safari, Microsoft Edge, and Firefox.
Meanwhile, “Google” is the company that makes the Chrome browser. Commonly, though, when folks think of “Google,” they’re thinking of the “Google.com” search engine.
More importantly, you can use Google as your search engine in other browsers like Edge and Safari. You do not need Google Chrome to use Google Search.
Similarly, just because you’re using Google Chrome does not mean your searches will always go through Google Search.
Are you looking to remove Yahoo from Google Chrome? What should you do if your searches in Chrome are going to Yahoo or Bing instead of Google? Sometimes people will change this on purpose, simply because they prefer another search engine over Google, but other times a program will ask to switch Google Chrome’s search engine to something like Yahoo without your notice.
No matter how your search engine got changed, there’s a few different things you can try to remove Yahoo or any other search engine and switch back to using Google Search in Chrome.
First, click the three dots menu button in the top-right corner of Google Chrome, then click Settings. On this page, scroll down to “Search engine.” Make sure that the setting labeled “Search engine used in the address bar” is set to “Google.”


If all goes well, your searches in the address bar should now default to Google Search.
If switching the search engine manually doesn’t change things, the next step we recommend is to reset Google Chrome’s settings to default. Open the Settings page again, and on the left-hand side of the page, click “Advanced” then “Reset settings.”
Next, click on “Restore settings to their original defaults” and you’ll be offered to confirm that you really do want to reset your customized settings. Click the “Reset settings” button to confirm.


Once done, your Google Chrome should be most of the way back to the way it was on day one. All of your Google Chrome extensions will still be installed, but will be “disabled” after reset. For help on how to re-enable them, look through our guide to removing/disabling Chrome extensions down below.
If your searches in Chrome are still going to Yahoo or another search engine instead of Google, even after resetting to default, you’ll want to check for malware using a program like MalwareBytes or seek professional tech support.
There are many, many reasons why Google Chrome can act up or feel slow, but before we dive in to more advanced methods, it’s important that we cover the easiest thing to check first and that’s whether or not you’re on the newest update. By default, Google Chrome should keep itself updated automatically, but sometimes this doesn’t happen. Here’s how to manually check whether Google Chrome is up to date.
First, click the three dots menu button in the top-right corner of Google Chrome, then hover over “Help” and click on “About Google Chrome.” When the next page opens, Google Chrome will immediately begin checking if you need a new update. Simply follow along with what it asks. Or, if you’re already up to date, you’ll see “Google Chrome is up to date.”


Click the clock in the bottom-right corner of your screen, this will open the notification list and Chrome OS’s quick settings panel. In this panel, click on the gear icon to open the Settings app. On the left-hand side of the page, click on “About Chrome OS.”


At the center of the new page that opens, click the button labeled “Check for updates.” If an update is available, your Chromebook will begin downloading and installing it immediately, then prompt you to restart. If there’s no update available you’ll see “Your Chromebook is up to date.”


That said, not every update to Chrome OS arrives for every device right away. Sometimes Google’s Pixelbook and Pixel Slate devices will get Chrome OS updates a few days earlier than others. It’s also important to check whether your Chromebook is still eligible for updates.
When used wisely, extensions can be a fantastic way to add new features to your Google Chrome browser. However, some extensions have been shown to drastically slow down Google Chrome or even hijack your searches.
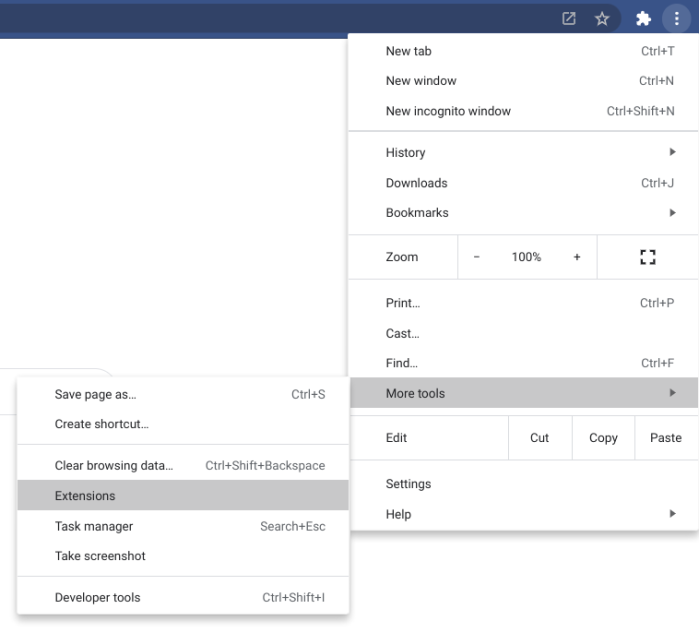
If your Google Chrome is acting weirdly or is being very slow, it’s probably time to look at your installed extensions and remove anything you don’t truly need. First, click the three dots menu button in the top-right corner of Google Chrome, then hover over “More tools,” and click “Extensions.”
In the page that opens, you’ll see a list of every extension you’ve installed for Google Chrome. Next to each extension, you’ll see a handy “Remove” button. After you click the button, a pop-up will appear asking if you’re sure you want to remove. Click the “Remove” button on the popup to confirm.
We strongly recommend that you remove every extension that you don’t recognize, as any one of them could be the culprit for Google Chrome being slow or any other issues.
If Google Chrome is still slow or acting strangely, you can try disabling your other extensions one-by-one. Open the Extensions page, as described above, and at the bottom right of each extension, you’ll see a little switch. Click the switch to turn that extension either on or off.


If you’ve removed or disabled all of your extensions and Google Chrome is still loading slowly or behaving strangely, you’ll likely want to check for malware using a program like MalwareBytes or seek professional tech support.
Notifications are without a doubt one of the most controversial additions to web browsers like Google Chrome in the last few years. On the one hand, notifications are necessary for the web to have the app-like experiences that developers have long dreamed of.
Conversely, some websites have abused notifications, making them one of the worst features of Google Chrome today. Luckily, it’s not too hard to turn off notifications for websites in Google Chrome.
First, remember that Google Chrome’s notifications are accepted on a per-site basis, which means you can turn off notifications from a bad website while still keeping notifications from Gmail or Twitter, if you so choose.
Click the three dots menu button in the top-right corner of Google Chrome, then click Settings. On the left-hand side of the page, click “Privacy and security,” then in the center of the page click “Site settings.”
On the page that opens, scroll down to “Permissions” and click on “Notifications.” At the top of this page, you’ll see a switch labeled “Sites can ask to send notifications.” If you turn this switch off, Google Chrome will never again ask if you want to receive notifications from any website.


However, this switch does nothing about the sites you’ve already agreed to receive notifications from. To turn those sites’ notifications off, scroll down to the section labeled “Allow.”
In the Allow section, you’ll find the list of websites that you’ve agreed to receive notifications from. Next to each of these, you’ll see a three dots menu button. To disable Google Chrome’s notifications for a particular site, click that menu button, followed by “Block.”

If you’re still receiving unwanted notifications from Google Chrome after cleaning out this list, your next step would be to try removing any extensions that may be misbehaving.
Source: (https://9to5google.com/)


